Which Forex Trading Dashboard Is the Best?
Contents
It is extremely important for any trader for orders to be executed in a fast and reliable manner. While the regular MetaTrader platform is good enough for performing basic tasks like buying and selling or setting up stop-loss and take-profit objectives, its capabilities can be not enough for more experienced traders who execute more elaborate strategies. Though newbie traders may also like to have more convenient and easier-to-use interface for setting up orders. The MetaTrader interface for tracking and managing already opened orders and positions also leaves a lot to be desired.
Fortunately, there is a solution to this problem — trading dashboards. They are a special type of expert advisors that provide a better interface for opening, managing, and closing orders, making those task much easier and more convenient.
Of course, different dashboards can provide somewhat different set of features, and they can also vary in how well they provide access to those features. In this article, we provide basic overview of several such dashboards as well as our impressions after trying out them for a little while to do simple tasks. Hopefully, these reviews will help you to choose a dashboard that is better suited for you.
How we tested the dashboards
To test the dashboards, we used a couple of simple strategies, which allowed us to see how well the dashboards perform basic functions.
Scalping Forex strategy involves simple buying and selling as the stop-loss it requires is too tight to be entered manually. While this can be easily done without any additional help and does not require a dashboard, it is still useful to check how well a dashboard executes such simple actions and whether it gives additional benefits compared with the basic MetaTrader platform functionality. The test also showed how it easy it was to track and close open orders.
Moving Average Cross Forex trading strategy involves setting stop-loss at a specific price point as well as putting a profit-target objective at a specific ratio to the stop-loss. It allowed us to see how the dashboards performed such relatively advanced actions.
Trade Assistant
Trade Assistant boasts a range of functions that should make it easier for you to open and manage your positions. The line function shows open line, stop-loss, and take profit, which should help you with opening a new order. Risk management helps you to determine the lot size based on your risk/reward ratio, the percentage of your deposit you are willing to risk, and stop-loss. Orders management includes a variety of options, including partial close, trailing stop, and moving the stop-loss to breakeven.
It is important to note that the dashboard is constantly updated and improved, so by the time you read this review it may look somewhat differently. But the updates usually do not change the look and functionality drastically, so the review should still largely apply to the later versions.
Differences between MetaTrader 4 and MetaTrader 5 versions
There are no noticeable differences between the MetaTrader 4 and MetaTrader 5 versions.
Demo-version
Demo-version is available for both MT4 and MT5. It includes all the features of the full version but works only on demo accounts.
Manual
A detailed manual is provided.
General look and features overview
The dashboard appears as a window with various tabs that allow you to open a position, close opened positions, adjust various settings, and receive information about your account and statistics about your trading.
Trade
The Trade tab allows you to set your risk parameters and place an order.

The photo camera symbol in the upper left of the window allows you to take a screenshot of the chart.
Underneath it, a dropdown menu provides a list of available symbols to choose from. It works differently depending on the settings. By default, you can choose a symbol if no orders are placed, but once you place an order, the dashboard is linked to the current chart, and you can no longer change symbols using the menu. To trade a different symbol, you need to open a different chart and a different instance of the dashboard. But if the Manage All Symbols option is selected, you can manage all the symbols without changing the chart window, selecting them from the dropdown menu instead.
The time indicator in the upper right corner can show either the server time or the time before the candle closes in the current time frame.
Below, the main tabs are situated: Trade, Close, Settings, and Info.
Underneath, information about spread and commission is shown.
To the right, the Eye symbol turns the display of trade levels on and off, and the Calendar symbol allows setting orders to be placed at the specified time on the specified days of the week. The Bell symbol sets alert lines on the chart.
In the risk parameters, you can adjust the percentage of your total account balance you are willing to risk each trade, set the risk/reward ratio, as well as turn it on and off. Additionally, you can turn on and off the automatic calculation of lot size depending on risk parameters. The Lines button turns on and off lines that show stop-loss, take-profit, and open position levels.
You can add a comment to your order in the Comment field.
The Entry portion of the tab allows you to set the parameters of your order. You can change the lot size manually only if the automatic lot calculation is turned off. The Price button changes the entry price, as well as the stop-loss and take-profit, between the specific price and the distance from the market price in points. The buttons below allow you to Sell and Buy as well as to place Sell Stop, Buy Stop, Sell Limit, and Buy Limit orders.
The blue square button between the Sell and Buy buttons shifts between the buttons to place stop and limit orders and buttons to manage already placed orders and opened positions.

You can delete your orders, close all opened positions, close all sell or all buy positions, close a portion of a position as a percentage of the volume, and move your stop-loss to the breakeven level.
Close
The Close tab shows you information about the opened positions and placed orders and lets you manage them.

The Profit column shows you a profit (or a loss) for the opened positions of the specific type. The % reveals what percentage of the total balance the profit or loss constitutes. The Total column shows the number of positions and orders of the specific type. The Type column shows the types of positions and orders and also allows you to close positions and delete orders of specified types.
The Symbols all option allows you to manage all the symbols from this window, provided the trades were opened by this application with the same EXPERT ID. The ID all option allows you to choose between the instances of the application with different EXPERT IDs.
The Close all if portion of the tab allows you to set up parameters for automatic closure of all positions if the specified conditions are met.
Settings
The Settings tab is divided into four sub-tabs: General, In parts, Trailing, and Other.
General
The General tab lets you set parameters for opening a position.

You can set a method for risk calculation, limit opening a position if the current spread is greater than the specified, and split a position into several parts.
You can also enable the Manage all Symbols feature and save the current settings to presets.
In parts
The In parts tab lets you set up a partial closure of the position if the specified stop-loss or take-profit levels are reached.

Trailing
The Trailing tab allows you to set up a trailing stop.

Other
The Other tab includes miscellaneous settings.

You can set up for the stop-loss to move to the breakeven level or slightly above it to lock in profits. You can also set an offset, including an automatic offset that offsets the breakeven level to take into account the spread and the commission.
You can also set up trailing pending orders.
Additional features include setting a One-Cancels-Other order, hidden stop-loss and take-profit, and a virtual pending order.
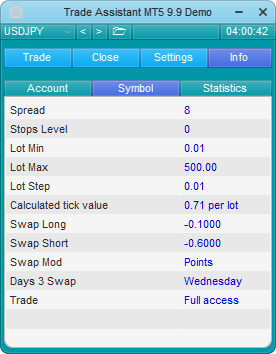
Info
The Info tab consists of three tabs that show various useful information about: Account, Symbol, and Statistics.
Account
The Account tab shows information about your account, such as balance, equity, free margin, etc.

Symbol
The Symbol tab shows information about the chosen symbol, like spread, the minimum and maximum size of the lot allowed, etc.
Statistics
The Statistics tab shows your trading statistics. It includes your gross profit, gross loss, total net profit, the win/lose ratio, etc.

Trade lines
The trade lines help you to place an order and provide useful information.

The open position line shows whether you are buying or selling (the lines will be green if you are buying and red if you are selling), the lot size, and the entry price. To shift between buying and selling, click the R button to the left of the line.
The stop-loss and take-profit lines show the number of pips from the open price, the potential profit and loss, the risk/reward ratio, and the price level. Click the L button to lock the price for that line. The button will turn blue. Click it again to unlock the price.
The open price line is magnetized to the market price. If you move it to the market price, it will be following the market price, and the stop-loss and take-profit lines will be following it, unless they are locked.
Management of open position
Once you open a position, information about it will appear near the current price level. Information about an order will appear near the level you placed it at.
![]()
The information shows whether you are buying or selling, the position size, and the current profit or loss. The three dots to the right of other info open the position management menu.

The menu gives you a range of options for position management, including closing a part or a whole position, moving stop-loss to breakeven, editing the position, changing the colors of trader lines, etc.
Review
Look and aesthetics
Trade Assistant is probably the best-looking dashboard among the ones we have reviewed. Its look the most pleasing to the eye, with a nice choice of colors. Distinct and easy-to-read buttons and other interface elements, which are organized in a simple and logical manner, make the application easy to use. Most elements have a clear purpose, making it possible to start using the dashboard without a deep dive into the lengthy manual.
Not everything is ideal, though. In particular, the layout of the Close tab can be a bit confusing. While the display of the positions is neatly organized in logical rows and columns, it is crammed together with the orders display, which uses a different layout. This makes it hard to read the information if you have several positions and orders for the same symbol. Adding to the confusion, what seems to be different categories are, in fact, buttons to close different types of positions and orders. But because a single position or order can be affected by several buttons, it can be shown several times in different places. For example, if you open a buy stop order, it will be displayed in both Delete Buy Stop and Delete Stop. Such an approach to organizing information can make it hard to see at first glance how many positions and orders you have and what type.
Opening positions and placing orders
Initially, the dashboard feels great. You can set your price levels both directly and by dragging trade lines on the chart, whichever method you find easier. Stop-loss and take-profit can be automatically calculated based on your desired risk/reward ratio, while the lot size can be automatically calculated based on your risk tolerance. Furthermore, stop-loss and take-profit levels are automatically recalculated each time the price changes. Or you can lock one or both of them at a specific level. For example, one of the strategies used for testing requires setting a specific stop-loss and then calculating take-profit as a ratio in relation to stop-loss. Trade Assistant makes it very easy to do, allowing you to lock stop-loss at the specified level and then automatically calculate take-profit based on the set risk/reward ratio.
Unfortunately, it does not take long for flaws to start to mar the good first impression. For starters, the interface for opening positions and placing orders looks excessive, with a host of redundant features. Is it really necessary to set the risk/reward ratio as two separate numbers? Granted, it allows you to adjust your stop-loss and take-profit more precisely. And it can be useful if you, for whatever reason, decide to use only stop-loss or only take-profit. But the risk/reward ratio makes stop-loss and take-profit inherently interdependent, and if you wanted to adjust them separately, you could easily do it manually.
Separate buttons for different kinds of orders also seem unnecessary. If you move the entry price away from the market price, it will inherently change into a pending order of the appropriate type. And if you turn on the display of market lines, it will even say so. For example, if you move the buy price above the market price, it will say Buy Stop. But if you click the Buy button, it will execute the order to buy at the market price. To actually place a buy stop order, you need to click the Buy Stop button. And if you click any other button, the application will display an error. All this feels unnecessary and clunky. A single button to open a position or place an order, which changes its nature depending on the entry price relative to the market price, would make much more sense.
Turning stop-loss and take-profit on and off also caused an unnecessary headache. To turn them off, you need to enter zeros in the appropriate fields. It is not hard to do but a bit clunky. Turning them back on, if you want them to be calculated automatically, can be a hassle, though. You need to enter some number in the field to turn it on. But then, the application might not change the number automatically based on the risk/reward ratio. You might need to enter different numbers into the Stop-Loss and Take-Profit fields as well as turn on and off the automatic R/R ratio calculation a few times before the application recalculates everything properly.
Position management
As we have used very simple strategies to test the dashboard, managing them was not a problem. In fact, the Moving Average Cross strategy does not require management at all, as you can just set it up and forget. Sometimes, stop-loss or take-profit were not triggered immediately once the market price reached the appropriate level, but that might be on the broker, not the application. The scalping strategy was even simpler, requiring just opening and closing the position. While it had to be done fast, it was not a problem with just one position.
But it is easy to see how managing your orders and positions can be awkward if you decide to use more involved strategies, especially if you place several orders and/or open several positions. The problem is that the application window does not allow tracking each position separately, throwing them into one pile depending on their type. You can see information about your orders and positions on the chart itself, but that might not be ideal if your charts are crowded with indicators, trade lines, and other stuff. Besides, you need to open a separate menu to operate a specific position. And that is not great when you want to do something quickly. For example, if you want to close your position, it can be done very fast through the application window by clicking a single button. But if you have to use a menu, you need to click the position info to call the menu, then click the Close option, and then click to confirm your decision. And this process is frustratingly slow, at least compared to a one-click operation.
Final thoughts
Trade Assistant has some idiosyncrasies that prevent it from being a perfect dashboard. Nevertheless, it is still very easy to learn and use, proving a great help in executing and managing your trades. The nice look does not hurt, either. The relatively low price of the application also makes it appealing. And you can always test it before making a purchase, which is definitely a plus, though the demo version does not always provide the latest version of the dashboard.
Trade Assistant 38 in 1
Trade Assistant 38 in 1 for MetaTrader 5 (or Trade Assistant Pro 36 in 1 for MetaTrader 4) is a dashboard that boasts of having 65 functions that should help you in trading. They include functions that help to open a position or an order (such as lot, risk, and reward/ratio calculation), to manage your positions and orders (such as closing, modifying, auto-closing, creating a trailing stop, and moving your stop-loss to breakeven), to check trade statistics and market analysis, and also provides miscellaneous trade indicators and utilities.
Differences between MetaTrader 4 and MetaTrader 5 versions
The two versions are almost identical. The only difference mentioned in the manual is the way how pending orders are handled. In the MetaTrader 4 version, the application monitors the orders itself without sending them to the broker's server. That means you have to keep your trading platform with the dashboard opened constantly or use the VPS. In the case of the MetaTrader 5 version, activation triggers are sent to the server but only for Buy/Sell Stop/Limit orders.
Demo version
A demo version is available for both MetaTrader 4 and MetaTrader 5 versions. The demo version has the full set of functions but works only with the AUD/USD currency pair.
Manual
A user manual is available for download. It provides a comprehensive description of all the application's functions and explains how to use them.
General look and features overview
Assistant 38 in 1 is a panel with tabs that allow you to open a new trade, manage existing ones, get information about the market and your trading statistics, and use additional tools and indicators.
The panel has the ^ (an arrow up) button in the upper left corner. It minimizes the panel.
![]()
In this mode, the dashboard shows the current time, the x button that closes the panel, the s button that takes a screenshot, and the T button that shows/hides buttons to manage existing trades. The 'arrow down' button returns the panel back to the default mode.
In the default mode, the M symbol allows you to move the panel. To do so, you need to point the mouse cursor at the symbol, click and hold the left mouse button, and drag the panel to where you want it.
New
The new tab allows you to open a new trade as well as calculate the risk or the lot size.

The L button shows/hides trade lines. The number next to it shows the current spread. The id button enables/disables an internal id. You can then manage trades with the same id as one group. The number next to the button shows the trade id if it is enabled. The P button allows you to choose a preset or save the current settings as a preset. The s button opens a window with additional settings for the new tab. The D button switches between light and dark interface themes. The T button shows/hides trade lines for open trades, the same as in the minimized mode.
The next section is where you set the risk and the lot size. You set one of the parameters manually, and the other one is calculated automatically. You can choose whether you want to risk a percentage of the total funds or a specific amount. Four customizable hotkeys allow you to set a risk or lot size quickly.
The following section allows you to specify the entry price. The Entry: buttons switches between Market Execution and Pending Order modes. In the Pending Order mode, additional settings appear. You can specify the entry level as well as choose between different types of entry level calculation: as a specific price level, as a number of pips or points from the current market level, as a percentage of change, etc. Furthermore, you can specify a level at which the pending order should be activated or canceled.
The section below is related to stop-loss and take-profit levels as well as the risk/reward ratio. You can turn stop-loss and/or take-profit levels on or off, set them, choose how they are calculated (the same choice of calculation types as for the entry price in case of a pending order), and toggle hidden stop-loss and/or take-profit levels. You can also toggle the automatic calculation of the take-profit level based on the stop-loss level depending on your set risk/reward ratio. The four customizable hotkeys allow you to set the R/R ratio quickly.
The next section shows the specifications of your order, including the potential profit at the take-profit level and the potential loss at the stop-loss level. It also lets you place several copies of the same order, type notes for the order, and set up multiple take-profit levels.
The buttons below allow you either to buy or to sell at the market price or to place a buy or sell order. If the stop-loss and/or take-profit levels are activated, only one of the buttons will be active. The buttons show the lot size you will be trading and, in case of a pending order, an entry price.
The last section varies depending on whether your order is set to Market Execution or Pending Order. In the case of the market execution, it will show the size of the last tick. In case of a pending order, it will show additional settings for the order. They will allow you to set an expiration date for the order, activate hidden pending orders, place One-Cancels-Other pending orders, and choose to activate the pending order later as well as set when you want it to activate.
Settings
The settings for the new tab have a number of different options you can adjust. Among them are the look and behavior of the interface, customization of the four hotkey buttons for different tabs as well as keyboard hotkeys, the way the fractions are rounded, whether to include the commission to the lot calculation, etc.

Manage
The manage tab allows you to modify or close existing trades. The s, D, and T have the same functionality as in the new tab - opening settings, toggling the dark theme on or off, and toggling trade levels for the existing trades on or off, respectively. The number in the upper left corner shows the current floating profit/loss of the entire account. The manage tab has its own subtabs.
Groups
The Groups subtab allows you to manage a group of trades. You can choose between ALL symbols and a specific Symbol. You can also choose between managing All id or a specific id. You can create a group of trades that includes several different symbols but not all of them by assigning those trades the same id.
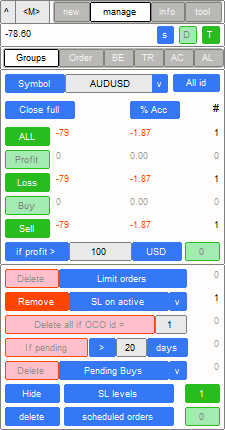
The section below shows you the profit/loss of the whole group as well as the performance of different types of trades. It also lets you close active trades. You can close all trades in the group, all buy or all sell trades, only profitable trades or only losing trades. You can also choose between closing a whole position or just a percentage of the lot size. You can switch the way the amount of profit/loss is displayed - as a percentage of the whole account, of the lot, in pips, or in points. You can also set trades to close if profit reaches the specified amount. It can be specified in a value of the currency, pips, points, as a percentage of the whole account, or as a percentage of change.
Below, several buttons are located. They provide additional options for managing your trades. They include deleting limit/stop orders, removing stop-loss/take profit levels as well as removing expiration/cancellation levels for pending orders, deleting all OCO pending orders with the specified id, deleting pending orders if they exist either for longer or for less than the specified time, deleting all pending trades or pending trades of a specific type, hide or unhide stop-loss/take-profit/pending orders from the broker, delete or activate scheduled orders, pause/unpause hidden orders.
Order
This subtab allows you to manage a single trade or a group of trades.
If no trade is currently selected, the panel lets you choose it.
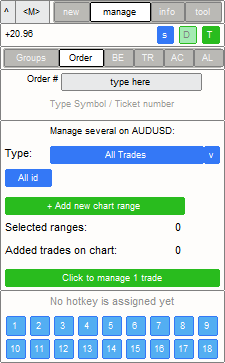
The field Order # helps you to find the required trade(s) by entering the name of the symbol or the ticket number. All active trades matching the criteria will be displayed, and you will be able to choose the one you want to manage.
The section below allows you to select a group of trades to manage. You can choose whether you want to manage all trades matching the criteria set above or a certain type of trades. You can choose to manage trades with a specific id. If you click the +Add new chart range button, the interface for selecting a range will appear. You can enter the prices for the range manually or drag the borders of the range that will appear on the chart after clicking the button. All trades between the selected price levels will be included in the group. You can also add trades to the group one at a time by clicking on the + button to the left of the trade info on the chart if the trade lines are toggled (which will be discussed later in their own chapter). If you click on the info itself instead, you will manage that single trade. To finalize setting the range, click the green ok button. You can add several ranges if you want. The panel will tell how many ranges you have set and how many trades are within them. To remove a range, click the red x button. After selecting a type of trades you want to manage or a range, the green button at the bottom of the section will show you how many trades match your criteria. If you click it, you will be managing those trades.
If you toggle on the show info option in the settings of the new tab, you will be able to set a hotkey for a trade after it has been executed. If you did so, clicking on the appropriate hotkey at the bottom of the manage/Order tab will allow you to choose that trade quickly.
Once you select a trade or trades, the look of the subtab changes. The present example shows the management of a single open position. The interface for managing pending orders and several trades does not differ much and has similar functionality, with few small differences, which you can learn from the manual.
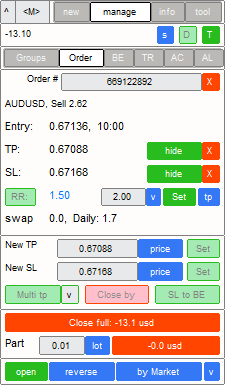
At the top, the information about the selected trade is displayed. It includes the Order # (clicking the red X button next to it unselects the trade), followed by the symbol, the trade type, and the lot size. Next, the entry price and time are displayed. Following that, you can see the stop-loss and take-profit levels if they were set. You can click the green hide/unhide button to hide and unhide the SL and TP levels from your broker. The red X button cancels SL/TP. The R/R ratio is displayed next, with the current swap amount and the swap size debited daily below it.
The subtab also allows you to modify your existing trade. To the right of the R/R ratio are buttons to set a new stop-loss or take-profit level based on a different risk/reward ratio. The buttons below allow you to set new stop-loss and take-profit levels manually. Next, there are buttons for creating multiple take-profit levels, setting a counter trade that cancels the current position if executed, and quickly moving the stop-loss to breakeven.
The next section allows you to close the position. Clicking the Close full button closes the whole position. The button shows the floating profit/loss. The color of the button is green when the trade is profitable and red when it is a losing trade. The buttons below let you close a part of the position if the lot size can be divided.
The buttons at the bottom of the subtab allow you to Copy or create an inverted copy (Reverse) of the existing trade, keeping all the parameters. You can choose between the Same entry price or the Market entry.
BE
This subtab contains two more subtabs - one deals with moving stop-loss to breakeven, the other with automatic breakeven:
-
Move SL to BE now
This subtab allows you to move the stop-loss to breakeven manually.

You can choose a specific Symbol or select All symbols. Next, you choose to which type of trades your selection should apply: All, Longs, Shorts. You can also choose to move stop-loss to breakeven only if profit exceeds the specified value. Additionally, you can set an offset that moves the stop-loss from breakeven closer to take-profit. Thus, you can ensure to secure at least some profit if the market moves against you. The v (arrow down) button allows you to choose the calculation method for profit and offset. The green L button lets you preview the potential breakeven levels on the chart. Once you set all the options, the green button at the top of the tab will show you how many trades match your criteria. Clicking on the button moves stop-losses on all the selected trades to breakeven (plus offset if you set it).
-
Auto BE
This tab allows you to initiate the automatic breakeven function. It has a very similar interface to the previous tab.

You can activate the function for the current symbol (For AUDUSD in this example) or All Symbols. Next, choose for which type of trade to apply the function: All, Longs, or Shorts. You can also choose to activate the function only if profit reaches the specified amount and set an offset that moves stop-loss closer to the take-profit level. You can save your automatic breakeven settings to Presets to quickly activate the function in the future.
In the settings of the manage tab, you can choose to include spread, commission, and swap in the breakeven calculation. This setting will work for both manual and automatic breakeven functions.
Once to set up your automatic breakeven function, click the green Activate automatic BE button to activate the function. Once it is activated, you can click the red X (cross) button to deactivate it. The status of the automatic breakeven function (whether it is activated or not) is displayed at the bottom of the tab.
TR
This subtab consists of two subtabs that allow you to activate automatic trailing - one for stop-loss and the other for pending orders.
The top and bottom sections of both subtabs are the same. At the top section, you can choose to activate trailing for the current symbol or ALL symbols. You can also choose whether trailing starts immediately after execution or when the specified condition is reached. For stop-loss, it is a specific amount of profit (different methods of profit calculation are available - in the currency value, pips, points, percentage of change, etc.). For a pending order, it is a specified time (you can choose whether it is a set number of minutes, hours, or days). You can save your settings to the Presets. Once you set all the options, click the green Activate Trailing button to activate the trailing function. You can then press the red X button to deactivate it. The bottom section shows the trailing status.
-
Trailing Stop
The Trailing Stop allows you to choose the method for stop-loss calculation and when stop-loss is automatically moved.

-
Order Trailing
This tab allows you to decide whether stop-loss and/or take-profit will be moving.

AC
This subtab allows you close trades when specified conditions are met.
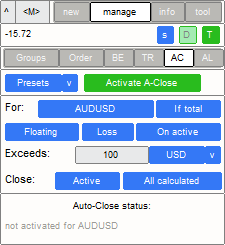
As in the previous subtabs, you can choose whether the function will be applied to a specific symbol (For Symbol) or all symbols (For ALL). Next, you select whether to close the trade(s) when the specified profit or loss is reached (and you can decide whether the profit/loss is calculated for all the selected trades or each trade separately) or at a specified time.
If you want to close trades when the specified profit/loss is met, you select whether account for floating P/L or potential P/L, what should be calculated (profit, loss, or profit or loss - only for floating type), to what type of trades automatic close should be applied (active, pending, or both), the amount of profit/loss for automatic close and the method of its calculation, whether to close all trades selected during calculation or close until P/L level is normalized.
If you want to close trades depending on time instead of profit/loss, you either set a specific time and date for automatic close or a period (minutes, hours, or days) after which trades will be automatically closed.
Regardless of the chosen conditions for automatic close, you set whether to close only active trades, only pending trades, or both. Once you have set up all the options according to your preferences, click the green Activate A-Close button. It will then be replaced by the red X button that you can click to deactivate the automatic close function. The status of the function is displayed at the bottom of the tab.
AL
This subtab allows you to set automatic trade levels for trades that do not have them yet.

As with the previous subtab, you start by choosing whether to apply the function to a specific symbol or all symbols. Next, you select whether to apply the function to active positions, pending orders, or all trades (both active and pending). Following that, you can activate and deactivate stop-loss and take-profit levels separately, set the method of their calculation and the appropriate value, make the S/L and T/P hidden, and activate multiple TP levels. After that, you decide whether to apply the auto-levels function to all 'magic' numbers, to the specified 'magic' numbers, or all 'magic' numbers except for the specified. As with the previous subtabs, you can save your settings to Presets. Click the Activate A-levels button after you have set all the options. As with other functions, it will then be replaced with the red X button that deactivates the function. The status of the function is displayed at the bottom of the subtab.
Settings
The blue s button opens settings for the manage tab, allowing you to adjust various options for managing your trades.

In the settings, you can choose whether to confirm critical operations to protect yourself from misclicks, set what green/red colors of trades on the chart mean (it is either profits/loss or buys/sells), enable or disable notifications for various automatic actions and select how exactly you will be notified (info in terminal, sound alerts, Telegram alerts), whether to include swap and commission when calculating profit and loss, whether to include spread, commission, and swap when moving the stop-loss to breakeven, whether to move the stop-loss to entry price if costs exceed the floating profit, decide whether to apply automatic functions to all trades or only to those open through the utility, whether to close the original trade after you have copied or reversed it, what to do if the lot size of the active position cannot be divided exactly with the specified percentage set in the Groups tab (you can choose either to close the nearest available lot or to skip the trade without closing it).
Info
This tab contains two subtabs. One provides information about the currently chosen market, while the other shows your trading statistics.
Info
This subtab shows various details about the market of your choosing.

The green Power button to the right of the subtab selector opens a movable window that shows the current strength of major currency pairs.

The field at the top of the subtab allows you to select a currency pair or another trading instrument. The blue v button to the right of the field opens shortcuts for quick selection of a symbol. The blue button to the far right selects the calculation method for the following sections and volatility between Price, Pips, Points (Pnts), and %.
The next section shows some basic statistics about the currently chosen symbol. That includes spread, swap for long and short positions, symbol load (potential loss for all open and pending trades), and total load (potential loss for all symbols).
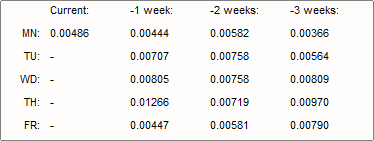
Next, you set the timeframe and the number of periods for the analysis of price changes. The analysis includes average, maximum, and minimum volatility. The green HL line toggles the lines on the chart that show the minimum and maximum prices for the chosen time period. The blue v to the right allows you to choose whether to show the high/low lines even when you select a different tab. Regardless of whether you toggle the HL lines on or off, the visualization below shows the current position of the market price in relation to the minimum and maximum prices. Below it, you can see how much time remains till the current bar closes. Further below, you can see how many bars have closed above, below, and at the open price in the selected period. The green Volatility button to the left of the volatility information toggles a movable window that shows the absolute volatility for each day during the last four weeks.
The field at the bottom of the subtab allows you to make notes about the currently chosen symbol.
Stat
This subtab shows statistics about your trading.

You can choose whether you want to display statistics for ALL symbols or a specific Symbol. The blue button to the right lets you choose the calculation method: in currency, points, or pips. Below it, you select whether you want to see statistics for All history or a specific period in minutes, hours, days, or bars.
Next, you can see the statistic itself. It includes gross profit and loss, total profit/loss, total trades, how many long and short trades were profitable versus total trades (both in the absolute figure and percentage), the profit factor, average holding time (for all trades and separately for long and short trades).
Tool
The tool tab contains various tools and utilities.
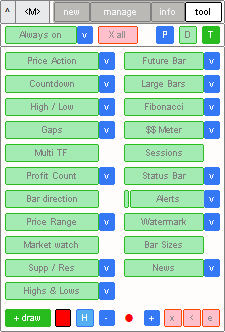
You click the green Aways on button to show the selected indicators even if you go to a different tab. By default, this setting is applied to all activated indicators. You can switch it for applying only to the selected indicators by clicking the blue v to the right of the green button and selecting the indicators you want to be always displayed.
Toggle each indicator, tool, or utility on and off by clicking the button with its name. To the right of each button, there is a blue v button that opens settings to the respective indicator.
Buttons at the bottom of the tab let you draw on the chart. Click on the green +draw button to start drawing. It then changes to a red stop X button that you can click to stop drawing. Next, you can choose the color to draw with. The blue - and + buttons decrease and increase the brush size. A sample of how the drawing on the chart will look is shown between the - and + buttons. The three red buttons are for removing all drawings from the chart, clearing the last group of objects, and toggling on/off the eraser tool.
Trade lines
Clicking the green L button in the new tab turns on trade lines that show entry price, stop-loss, and take-profit levels. Clicking it again turns the lines off.

The entry price line info shows the entry price, the lot size, and the risk/reward ratio (if activated). The stop-loss and take-profit lines info shows the price level (or other appropriate value if a different method of calculating stop-loss and take-profit was selected) and the potential loss/profit (either in percentage or monetary value, depending on settings).
By clicking and dragging the info, you can change the levels. If you drag the entry level away from the market price, the instant execution order will turn into a pending order. The type of the pending order will be displayed in the info about the entry price. Clicking blue - and + near the trade line info moves the price down or up by the spread amount. Clicking the blue R button to the left of the entry price info reverses the order, allowing you to switch between buy and sell orders. Clicking and dragging the <> icon to the left of the entry price info allows you to change the width of the TP/SL areas.
Management of open position
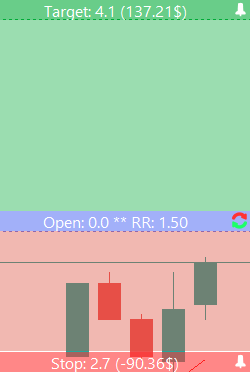
Once you open a position or place an order, it will be displayed on the chart if you toggle this functionality on by pressing the green T button, which is present in any tab. For example, this is how a single open position looks on the chart:
![]()
The information shown here contains the lot size, the entry price, and the floating profit/loss. The color of the information can be either green or red. Depending on the settings, it can show either whether it is a buy/sell trade or whether it is profit/loss. The + button to the left of the info adds the order to the group of orders to manage.
If you click the information while managing a single order, the TP/SL areas will be displayed.

Now, the entry price information shows the trade type, floating profit/loss, and the risk/reward ratio (if it is activated). The TP and SL levels information show their value (be monetary value, value in pips or points from the entry price, etc.), the potential profit/loss in the currency value and percentage. You can drag TP/SP levels to change them. If the R/R ratio is active, dragging one level changes the other according to the ratio. If you want to set the levels separately, you will have to disable the R/R ratio. If you drag change take-profit and/or stop-loss levels by dragging them, a new set of buttons will appear to the left of the information about the level. The green Set button let you to set the new level for the selected order. The red x button aborts the adjustment of the level.
If you click on the order while in the group management mode, additional buttons for quick adjustment of the order will appear.

They let you quickly close the trade, move the stop-loss to breakeven, close the lot partially or increase the lot size, set a new stop-loss and/or take-profit, reverse the trade, copy the trade, activate a pending order, and start advanced trade management.
Review
Look and aesthetics
Assistant Pro has a nice and clean look. Initially, the large number of various buttons and functions may look a bit overwhelming. But after reading the manual and practicing a bit, the interface starts to seem logical and easy to use. It is still, arguably, a bit crowded, but, in practice, it does not hinder usability. Clear and consistent rules about how interface elements look and work further help make learning and using the dashboard easy.
Opening positions and placing orders
Assistant Pro makes it very easy to create a trade. You can very easily and quickly toggle stop-loss and take-profit levels on and off, set TP and SL (by entering the specific price or dragging trade lines on the chart, both being equally simple methods), toggle and adjust the risk/reward ratio, and, finally, place an order. Adjusting trade levels on the chart is made even easier by the Shift + V hotkey that places all trade levels in the visible area of the chart, which is useful if some levels are outside of the visible area and you have trouble adjusting them. Buying and selling are performed by just two buttons, only one of which is active if SL and TP levels are activated. That makes the interface simpler and less crowded compared with dashboards that have a separate button for each of the possible order types. Unfortunately, the simplicity can sometimes lead to complications.
There was one instance when we wondered why the trade was not closing when the price reached the take-profit level. Only to realize that we somehow placed a buy limit order. It is hard to tell whether that was a glitch in the dashboard or our own mistake (for example, it is possible that we accidentally moved the entry level while testing various dashboard functions). Whatever the case, the fact that this can happen is worrisome. Of course, a trader should always be careful and pay attention to what they are doing. But sometimes, you need to act fast, and it can be easy to make mistakes in such instances. The fact that the same buttons are used for opening an active position and placing a pending order makes it even easier to make a mistake. One starts to wonder whether having a separate button for each type of order was such a bad idea. It would certainly make it much harder to place an order of the wrong type.
We also encountered other instances of strange behavior from the dashboard. Sometimes an order was not placed despite the dashboard confirming it. Sometimes the order was hidden even though we did not activate this function. And there was one instance when the dashboard was placing the market execution price far away from the actual market price. Such issues were not very frequent, and there is a chance that they were caused by our platform or broker, not the dashboard itself. But you should still be wary that it sometimes can behave in a way you were not expecting.
Position management
It is very easy and convenient to manage your positions and orders in Assistant Pro. You can easily choose a single position and track its performance in the panel, adjusting the position or closing it when necessary. You can also watch your position on the chart and see all the important information about it. In the group mode, you can easily manage the position directly from the chart, including closing it with just one click.
Besides the previously mentioned issues with a seemingly open position not showing in the panel, there is little to criticize in terms of position management. Sometimes trades were not closing after reaching the take-profit level, but it is possible that it was just an issue of our platform or broker not being fast enough with executing a 'close position' order before the price became less favorable.
Final thoughts
Assistant Pro is a very solid choice for any trader who wants an effective tool for placing orders and managing them. The interface might look daunting at first, but it becomes logical and easy to use once you learn its functions and the rules by which they are organized. Alas, the quirks and potential bugs do not allow us to call the dashboard perfect. Fortunately, the dashboard has a demo version you can use before paying for Assistant Pro. On the downside, the demo version is very limited, allowing one to trade just one currency pair. Still, it should give you an idea of whether you want to use Assistant Pro or not. The dashboard is more expensive than some other dashboards we have reviewed, but not extremely so.
Trade Manager
Trade Manager (also called Forex Trade Manager and EA Trade Manager) provides all the basic functionality that a dashboard needs. That includes drawing trade lines, setting your risk parameters, quick opening and closing of trades, automatic breakeven, trailing stops, partial closes, one-cancels-the-other orders, etc. The dashboard claims to work with any symbol, including currencies, commodities, indices, cryptocurrencies, etc.
Differences between MetaTrader 4 and MetaTrader 5 versions
There does not seem to be any difference between the MetaTrader 4 and MetaTrader 5 versions.
Demo version
A demo version is not freely available for download. But you can request a 7-day day trial from the dashboard provider. You then will have to choose whether you want a trial version for Windows or Mac.
Manual
A comprehensive manual is available in the form of a blog post. While it may miss information about the newest updates and features, being itself updated infrequently, the manual gives a good overview and explanation of all the features and functions of the dashboard.
General look and features
The Trade Manager application is an application that looks like a window containing four tabs that allow you to open new trades, manage existing trades, move stop-loss to breakeven, put a trailing stop, and configure the application.
The application window has the application icon and name at the top left. Clicking on the application icon minimizes the window, leaving only the icon visible. Clicking on the icon again restores the window. The buttons at the top right allow you to minimize the window or close it, removing the expert advisor from the chart.
Placing Orders
The Placing Orders tab lets you open new orders as well as manage existing ones.

The five buttons at the top of the tab allow you to set up trade lines and adjust a couple of other options. The Draw Risk Reward Ratio Lines button allows you to place trade lines. Once the trade lines are placed, the button will change into a Clear Risk Reward Ratio Lines, clicking on which removes the trade lines. The Adjust open line to current price does what it says on the tin - automatically moves the open price to the current market price. This feature is useful when you want to open a position immediately, but it is better to turn the feature off for placing a pending order. The Freeze SL and TP lines when adjusting to current price button determines how the stop-loss and take-profit lines react to the change of the opening price. If the function is active, the lines will remain at the same price level regardless of the changes in the opening price. If the function is inactive, the SL and TP lines will move with the opening price, keeping the set distance. The Keep fixed risk reward ratio button determines whether the SL and TP lines will move in sync, keeping the set risk/reward ratio, or will move independently of each other. The One Cancel the Others does not affect the drawing of the trade lines but rather the existing pending orders. If this function is activated and one of the pending orders is executed, the others will be deleted.
The next set of buttons allows you to open positions and place pending orders. If trade lines are not placed, the buttons will allow you to buy and sell at the current market price. If trade lines are placed, one button lets you buy or sell (depending on the position of the SL and TP lines) at the market price, while the other places a pending order. The number between the buttons shows the current spread.
The section below is concerned with stop-loss and take-profit. It lets you turn the SL and TP levels on or off, decide how the levels will be calculated (in pips, determining the distance from the open price, or as a specific price), make the SL and TP levels virtual (hidden from your broker), and place stop-loss and take-profit levels automatically (useful when the Trade Manager works on VPS, and you place orders manually from a smartphone).
Next, the dashboard shows the lot size and the risk percentage. The default acceptable risk level is set in the Configuration tab, but you can manually change the risk level for the specific transaction here in the Placing Orders tab. If the automatic risk lot/risk calculation is activated, the lot size will change depending on the risk percentage you have set. Or you can change the lot size, and then the application will calculate the risk percentage. Underneath, you can choose between different automatic lot/risk calculation methods. You can choose between disabling it, using a flat cash amount you are willing to risk, a certain percentage of your account balance, or a percentage of your equity. If the lot size is bigger than your broker allows, you can turn on the Unlimited Lot option in the program parameters. In that case, the application will divide the trade into several transactions. You can also set the maximum lot size allowed in the parameters.
Following that, you can set up additional order parameters. You can mark the order as a Virtual Pending Order, make it a Trailing Pending Order, or a Limit Pullback Order (which works only with virtual pending orders and only when the Trade Manager is running). You can also add a comment to your order.
The bottom portion of the tab deals with managing orders, not placing them. It allows you to move stop-loss to breakeven, to close a part of the position (the specific percentage is set in the Configuration tab), to close certain types of opened positions (All, those with Profit, or those with Loss), and delete pending orders (All, Limit orders, or Stop orders).
Manual Managing Orders
The Manual Managing Orders tab contains additional options for managing your traders.

In the dropdown Order menu, you can choose what orders you want to manage: ALL Trades, BUY Trades, SELL Trades, or a specific trade.
Once you choose the order, you can see the information about it: Order Type, Open Price, as well as Take Profit and/or Stop Loss if applicable.
You can change the existing stop-loss and take-profit levels or create them if you did not do so when you created the order. You can choose between entering the SL and TP levels as a set distance in pips from the open price or as a specific price level.
The last two portions of the tab allow you to set up a partial position close when the price reaches a certain profit or loss level. To do so, you need to enter how much of the position you want to close and the distance from the open price at which you want to close the part of the trade. The part of the position can be entered either as a fixed lot or as a percentage of the position. The distance can be set in pips, in percent to the final TP or SL level, or as a fixed price. The TP level for partial close can also be set at a certain risk/reward ratio.
Break Even and Trailing Stop
The Break Even Trailing Stop tab lets you automatically move the stop-loss to breakeven when certain conditions are met and to create a trailing stop.

If you want the stop-loss to move to breakeven automatically, you need first to enter at which level to Activate this feature. You can set the level as a distance in pips from the open price, as a percentage of the distance towards the take-profit level, as a level at which a certain risk/reward ratio is reached, or as a specific price level. You also need to enter how much of your profit you want to protect. The value can be set in pips, percentage, risk/reward ratio, or as a specific price.
If you want to create a trailing stop, you need to enter at which distance from the open price it is activated, at which distance it will trail the market price, and the amount of profit required to move the stop-loss (which affects how often the trailing stop is moved). The activation level can be determined as a fixed distance in pips from the open price, as a percent of the distance from the open price to the take-profit, as a risk/reward ratio, or as a specific price level. The trailing distance can be set in pips, percent, or risk/reward. The step can be entered as pips or a risk/reward ratio.
Configuration
The Configuration allows you to configure the Trade Manager to your liking.

You can set the risk/reward ratio, the acceptable risk percentage, the commission included in the lot size calculation, the spread multiplier used for calculating the SL and TP levels, and the percentage of the trade closed during the partial close.
You can choose where to draw the open price line when creating trade lines: at the point of click or above/below the selected bar. In the latter case, the Bar distance parameter determines how far above/below the selected bar the line will be drawn.
You can set a default line distance for the SL and TP levels.
Lastly, you can determine what information will be shown on the text bars for a planned order, for a market order, and for a pending order.
Trade Lines
You can set the opening price as well as stop-loss and take-profit either manually or by using trade lines. If you choose to draw trade lines, you will see something like this:
You can change the opening price, the stop-loss level, and the take-profit target by dragging the appropriate lines on the chart. You can enter a specific open price by using a CTRL+left click.

You can drag the block with the open price, stop-loss, and take-profit info and the stop-loss and take-profit areas horizontally to place it where it will be convenient to you. Clicking on the block's left or right border changes its width. Clicking the two arrows to the right of the open price info reverses the trade lines and shifts the order between buying and selling. Clicking at the pin to the right of the stop-loss or take-profit info pins the appropriate trade line. When the lines are unpinned, moving the open price level moves them as well, keeping the distance from the open price. When you click once, you pin them in place, so they do not move when you move the open price, but you still move them by dragging them with the mouse. If you pin the line by clicking the pin twice, you will not be able to move the line with the mouse. Take note that activating the risk/reward ratio will lead to the take-profit target moving when you move the open price, even if you pin it.
By default, the trade line info shows the distance from the current market price in pips. The open price also shows the risk/reward ratio, while the stop-loss and take-profit lines show the projected loss and profit, respectively. You can change the information shown in the info box by going to the Configuration tab and changing the appropriate option.
Once you place your order, it will be shown with a box with the open level info. You can click the box to also reveal the stop-loss and take profit levels as well as info about them.

By default, the open level info shows the current profit/loss, the type of the order, and the lot size. The stop-loss and take-profit info shows the distance from the open price in pips and the projected loss and profit, respectively. You can drag the block with the information and the stop-loss and take-profit areas horizontally and change its width the same way you create a new order.
By clicking the gear icon to the right of the open price info, you open the manage order screen.
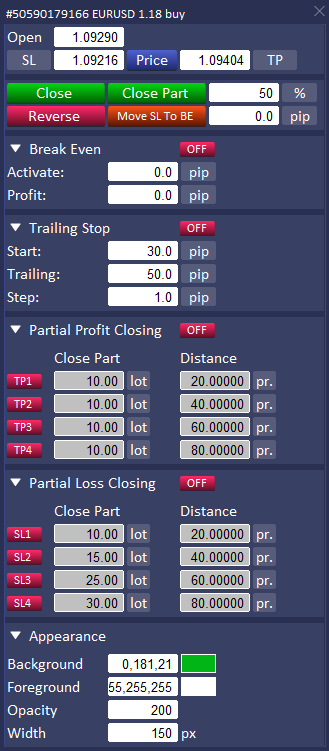
It shows the opening price at the top. The rest of the panel provides you with a whole host of options to adjust. You can change the stop-loss and take-profit levels. You can close the position (either completely or partially), reverse the order, and move the stop-loss to breakeven. You can set up and activate the automatic move of the stop-loss to breakeven, trailing stop, and automatic partial close. The panel also allows you to change the appearance of the information bar.
Review
Look and aesthetics
Trade Manager looks a bit weird by the modern standards. The dashboard aesthetics resembles some applications and video games from early 2000s, not a modern application. But that does not mean that the dashboard looks bad, just that it may take some time to get used to it.
If we turn our attention to usability, it is great for the most part. All the buttons and interface elements are big enough to read them easily and spaced well enough to be easily distinct and not crowded. Furthermore, elements on each panel are combined in logical groups that have clear separation, making it very easy to find required buttons, options, and information.
Some people may consider the options to adjust the looks of the interface and trade lines somewhat lacking. It is nice to have the option to change what data the information bars display on charts, but actually changing it can be obtuse. But that was not the problem for us during our testing of the application as the default look of the dashboard was perfectly satisfying for us.
Opening positions and placing orders
Trade Manager makes it very easy to execute trades.
The dashboard has two buttons for this - one for opening a position immediately by buying or selling at the market price and another for placing a pending order. This approach seems to achieve a good balance between having a separate button for each order type (which makes the interface crowded) and having just one button for trade execution (which increases the chances of executing a trade of a wrong type). This makes it almost impossible to accidentally place a pending order instead of buying/selling at the market price or vice versa. Mixing up buying and selling is also virtually impossible because buttons change their color depending on whether you open a long or short position.
You can turn stop-loss and take-profit levels on/off by using separate buttons. Unfortunately, the buttons do not immediately enable/disable the SL/TP levels. Instead, they open a menu that also allows making the levels virtual and enables automatic placement of the SL/TP level on each new trade. For us, it would be more convenient to have buttons that just enable/disable SL/TP levels and move other options related to SL/TP to a separate portion of the panel.
You may encounter problems with disabling SL/TP, as there are a bunch of conditions that can prevent you from doing so. You might be required to disable automatic lot/risk calculation, change the partial profit/loss calculation method from percent to pips, etc. The application tells you what the exact problem is so you can solve it. But it may take time to find where the necessary option is situated if you are not experienced with this application. And you may encounter several such problems in a row. It is strange to see such a simple feature being so finicky.
Setting trades is very easy using both methods, either manually entering specific numbers in the appropriate fields or using the trade lines. It is especially nice to have readily available buttons for enabling automatic calculation of take-profit based on risk/reward ratio, keeping the open price glued to the market price, and freezing SL/TP levels so they will not constantly change with the market price changes. The fact that the info bars display how much money you can gain or lose if the price reaches the take-profit target or the stop-loss level is also a very useful feature.
The infrequent but big problem was the fact that sometimes the application simply refused to execute trades without any explanation. To understand what is happening, we had to delve into the MetaTrader 5 Journal and Experts tabs. In our case, the automatically calculated size for certain currency pair was too big, and the platform complained that we did not have enough money. This issue was easily fixed by manually reducing the lot size. But it is very frustrating that the application does not say anything when it encounters a problem with executing a trade. It does not show any error message, let alone explain what the error is.
Position management
Managing trades in Trade Manager was easy enough, at least in the case of the simple strategies we used to test the dashboard.
Once the trade is placed, the info bar immediately appears at the open price. It shows the type of trade as well as the current profit/loss, which is very convenient. Clicking on the bar turns on the stop-loss and take-profit areas display, allowing you to see better how your trade is performing. You can select a specific order on the Manual Managing Orders tab to get information about the trade if you do not want to look for it on the chart, which is good. But the info you can see is very limited, which is bad. It does not even show whether you have a profit or a loss! Which makes the info the panel shows almost useless. Fortunately, the information provided by the info bars was more than enough in our case.
While the management options were sufficient for our simple use case, it is easy to see how trade management can become frustrating if you are going to use more involved strategies that require placing several orders. For example, you cannot choose to manage only pending orders or only opened positions manually. And even if you select the groups that are available (all buy trades or all sell trades), the application will not show any information about the group in the management panel. You have the ability to delete pending orders (all orders, all sell orders, or all buy orders) and to close positions (all positions, all sell positions, or all buy positions) in bulk. But for some reason, the buttons to do so are located in the Placing Orders tab, not the Manual Managing Orders tab, which is illogical and counterintuitive.
Trade Manager also does not have any statistics to show how well or poorly your trades were performing. That seems like a missed opportunity considering other dashboards have such a feature.
Final thoughts
Trade Manager is somewhat simpler and has fewer features compared with other dashboards we have reviewed. Depending on your needs, this can be an advantage or a disadvantage. On the one hand, the relative simplicity of the dashboard makes it easier to learn and use it. On the other hand, you may miss some of the features if you are using complex trading strategies and methods. Fortunately, you can use a trial version to see if the application is suitable for you. While it is not freely available for download, you can easily request it from the creator. In our experience, the response time was very quick. You should also take into consideration the price, which is among the lowest for the reviewed dashboards.
Conclusion
There is no perfect Forex trading dashboard out there. Even among these three dashboard that we reviewed, there is a potential for each one to be best-suited to some traders' needs while being either overly complicated or lacking in functionality for other traders.
This means that in order not to waste your money, you have to think carefully, which of the features you need and how compatible your strategy is with a given dashboard. Considering the fact that neither of the three is a cheap piece of software, it's best to try them first in a demo or rent mode to be sure of their suitability.
We, at EarnForex, do not offer an all-encompassing trading dashboard EAs, but we have two expert advisors that do their specialized job quite well and are free and open-source at the same time:
- Position Sizer — a powerful, yet simple, calculator that lets you size your trades according to your risk.
- Account Protector — an EA that lets you program several actions (like close all trades or disable autotrading) based on a large number of customizable conditions (like daily profit or margin level).
If you want to get news of the most recent updates to our guides or anything else related to Forex trading, you can subscribe to our monthly newsletter.